Monday 26 September 2011

If You Go Down To The Woods Today...

If you go down to the woods today

You're sure of a big surprise.

If you go down to the woods today

You'd better go in disguise.


For ev'ry bear that ever there was

Will gather there for certain, because

Today's the day the teddy bears have their picnic.


Right now that I've got you all singing... I'd better tell you why I'm ranting on about the Teddy Bears Picnic! Well today at Cupcake Craft Challenges the lovely Faye haschallenged us to make something with a teddy bear on it!!! Now I do love my teddies, so this was an easy one for me! I've kept my card C&S as I wanted to make the most of the lovely Penny Black image... it's such a cutie! The two bears are coloured with my Promarkers (still waiting for my flexmarkers boo hoo), I've used my Cuttlebug to emboss the heart background, added the digi sentiment with bakers twine, and finished with a few gems.

I'm entering my card into the following challenges:

Penny Black Saturday Challenge - Monochromatic (for me browns)

Ok so what can you win... well there's the weekly sponsor's prize which is 4 fab digis from Sassy Studio Designs, and then the monthly sponsor, Bunny Zoe's Crafts, who are offering a £15 Gift Voucher! Definately worth digging out a teddy image for I think!!! Please pop by the Cupcake blog to check out all the other DT projects... the girls always come up with some fab ideas!

Finally I just want to say thanks for all the lovely comments, it really makes my day when I see I've had visitors!

Saturday 24 September 2011

Digi Designs Challenge Blog - Make Your Own Flowers

Good morning! Well what can I say, the sun is SHINING here, and has been for the best part of the week! Today I think I'll have to get out in the garden, the weeds are slowly taking over the planet!

At Digi Design's Challenge Blog it's our 2nd fortnightly challenge today... Make Your Own Flowers! Another nice easy one! For my card I've used one of Di's cute digi's called An Apple A Day, isn't it a sweetie?! I've coloured with Promarkers, and the papers are My Minds Eye. The little flowers are easy to make, just cut a circle from paper then cut this into a spiral, turn the spiral into a little flower bud and glue together. I glued little pearls into the middle of each flower to finish off.

Pop over to the Challenge Blog to see all the lovely DT creations, and to check out the fab PRIZE!!!

Thursday 22 September 2011

October Challenge at A Scrap Affair

Good afternoon peeps! I'm a day late in posting this (oops, sorry) but here is my DT card for the October Challenge over at A Scrap Affair. This month we have a photo inspiration for you... I love these photos...


For a change I've used some yummy Distress Inks to colour my image, you can buy these over at A Scrap Affair Online Store. The sentiment is Penny Black called 'You are kind'. So, there's your inspiration... and the prize... Mmmm... a pack of Promarkers and some Kaisercraft Flourishes!!! Pop by our blog to see all the DT projects and of course to join in with our challenge!

Tuesday 20 September 2011

A Birthday & A Disappointment

Good morning folks! Isn't it starting to get chilly, brrrr! It's either that or too long living in France is turning me into a wimp!?

I wanted to share this little card with you, it's one I've made for my FIL who will be 70 on Thursday... he doesn't have a cat but loves our cat so I'm sure he'll like the card! I used this really, really cute digistamp that I won from DigiStamp Boutique, isn't is fabulous! There's also a version of this stamp with a sleeping dog instead of a cat... it's from The Smiths Collection - Dad Relaxing - Cat. I thought it'd be good for so many occassion! I have to say I really love it! I've coloured with Promarkers... now there's another story there, I'll get to that later... very easy image to colour! The papers are Basic Grey Archaic, the sentiment is a stamp from Artemio and the cute little charm was bought when I was in Scotland this summer... a fab little craft shop in Callander called 'Kokosnoot'. I'm entering my card into the September monthly challenge at DigiStamp Boutique.

Now for the disappointment... hmmm. Very kind hubby bought me some Flexmarkers as a surprise for my Birthday last week... as you can imagine I was delighted!!! However, after trying the pens (I have to say the brush nib is lovely but will take a bit of getting used to) I found a lot of the paler shades weren't actually colouring, only wetting the card with alcohol, even after scribbling on card for a while. You can imagine my disappointment when I wanted to get started with my new goodies asap :( So to cut a long story short, I contacted the Customer Services at Joanna Sheen (where hubby bought them from) and the lady I spoke to was so nice and helpful, apparently Letraset have had a few issues with some of the lighter pens... so they're going to replace the ones that aren't working properly! Result! Only now I have to wait for the replacements... patience is a virtue they say?!

Monday 19 September 2011

The Dark Side

Hiya everyone! Well the kids are well and truly Back To School... lovely to see all your cards last week for this challenge! Today it's another Cupcake Craft Challenge day... this week's theme 'The Dark Side' has been chosen by Delphine... she would like to see us using mainly Black & Purple on our cards.

My image is from Prairie Fairy, who kindly supplied the DT with a digi image... mine is called Tea Time. I've used Promarkers to colour... I have to say I'm not used to colouring images that need lots of 'shine' on them! I don't find this very easy with black!

I'm entering my card into the following challenges:
Simon Says Stamp - Sing It... Inspired by a song or movie (my inspiration is from the 1950 film Tea for Two with Doris Day)

Our sponsor this week is Prairie Fairy, who have the most gorgeous digi stamps and are giving a $15 Gift Certificate to one lucky random winner to spend in their online store. Our monthly Icing on the Cupcake sponsor is Bunny Zoe's Crafts who has a £15 Gift Voucher up for grabs! Be sure to check out what he DT girls have come up over at Cupcake, and if you have time leave a little comment to show some love!

Thursday 15 September 2011

Follow Your Heart

Hi folks! Just a quickie tonight, I wanted to post this card which I sent to a dear friend recently... it's a bit different to my usual cards but I like that. I've used some pretty Anna Griffin papers from A Scrap Affair Online Store. I really like the sentiment stamp, it's part of a clear set from Hero Arts and the pretty roses are from Wild Orchid Crafts.

Anyway, I thought this card would be perfect for the last Stamp Something Challenge - Anything Goes... I was sad to read that this challenge blog will be no more, I was in their Design Team a while back, the first DT I was ever asked to be part of!

My card also works for The Pink Elephant Challenge - A Vintage Theme and By The Cute & Girly - All Things Bright & Beautiful.


Well, have a lovely evening and thanks for popping by!

Tuesday 13 September 2011

School Starts Again...

This week at Cupcake Craft Challenges my DT buddy Jane has chosen BACK TO SCHOOL as the theme... yup it's September again and the start of a new school year! For my card I've used an image from Heather Ellis, coloured with Promarkers. The background paper was freebie from Tiddly Inks last year. The tickets and twine are from my friend Dianascarlett... thanks x

This week our sponsor is Quixotic Paperie who are giving away a £10 Gift Voucher to spend in their store. And our monthly Icing on the Cupcake sponsor is Bunny Zoe's Crafts who has a £15 Gift Voucher up for grabs! The DT girls have come up with some fabulous creations this week, check them out over at Cupcake! Oh and don't forget there's still time for you to join in with the Choose the Challenge Competition!

Saturday 10 September 2011

Digi Designs Challenge Blog Launch!

Hi blogging friends! Today is Launch Day for DIGI DESIGNS CHALLENGE BLOG, a new fortnightly challenge blog for Di's Digi Downloads, and guess who's on the Design Team ;) Anyway, our first challenge is really easy peasy to get you all started, it's ANYTHING GOES!

Ok my DT card for the challenge has been done with two of Di's lovely digi images... Fairy Wand & Mushrooms, you can find lots of lovely images on Di's Digi Downloads Blog. I used my computer to combine the two images together so the fairy looks as though she's standing on the mushroom. I've coloured using Promarkers. The papers are from Pink Petticoat, the flowers are done using my Nellie Snellen punch and card candy. I've used a lovely card blank from Crafts 4 You - I have to say I REALLY like these shaped cards! This is the first time I've used them, but they're fab, and a great size (148mm x 148mm).

Ok, if you fancy joining us for our first challenge then you have until Sept 23rd! Don't forget to pop by and check out all the DT creations, they're well worth a look!

Thursday 8 September 2011

Guylaine's Blog Candy

Hi peeps! I just thought I'd let you all know about a fab candy that my friend Guylaine is offering to celebrate her 2 year blogaversary. She's kindly offering some fabulous prizes, here's the information, go and check out her lovely blog HERE...


Pour célébrer les 2 ans de mon blog, pour vous remercier de votre fidélité et de votre gentillesse mes Copinettes adorées et pour vous faire plaisir, voici mon blog candy spécial Gorjuss. Vous êtes nombreuses à aimer ces adorables petites filles c'est pourquoi j'ai pensé à ce thème.

Il y aura 3 lots à remporter, donc 3 gagnantes qui seront désignées partirage au sort le 15 octobre 2011.

Lot n°1 pour la grande gagnante:


cliquez sur les photos pour agrandir

H15-006.jpg

10 articles Gorjuss: 1 cahier 14X21, 1 stylo bille, 1 carnet avec élastique, 1 carnet long avec stylo bille, 1 lot de 3 badges, 1 pochette de limes à ongles, un double paquet de mouchoirs en papier, 1 carnet pense-bête avec son miroir, et un gros carnet de 192 pages.

avec une planche 3D prédécoupée:

H15-005.jpg

Quelques détails:


le pense-bête avec son miroir ouvert:

H15-010.jpg

la pochette de limes à ongles ouverte:

H15-008.jpg

La double pochette de mouchoirs ouverte:

H15-009.jpg

Lot n°2:

H15bis-002.jpg

Contient un cahier 14X21, 1 carnet avec élastique, un pense-bête avec son miroir

Lot n°3:

H15-011.jpg

Contient un cahier 14X21, 1 lot de 4 carnets "Saisons" et un stylo bille

*Modalités de participation*:

*Merci de copier/coller cet article intégralement sur votre blog en y mettant le lien vers mon blog


*Me laisser un commentaire sous cet article avec le lien vers votre article annonçant mon blog Candy


*Si vous n'avez pas de blog, merci de me le préciser et de relayer l'info auprès de vos amies scrappeuses


*pas d'obligation d'inscription à ma Newsletter (mais recommandée si vous aimez mon scrap! lol) car je privilégie la qualité à la quantité de mes amies scrappeuses! lol!

Bonne chance à toutes et je vous dis au 15 octobre pour les résultats!

signature 1 et 4

Thanks Guylaine, it's really generous of you!

Monday 5 September 2011

Pretty Patchwork Quilt

WARNING!!! Ok this is going to be a LONG post so if you're going to stick around then you might want to grab a cuppa...

Right, that's better. Now I'll get started! Have you ever thought about doing something and NEVER gotten around to doing it? Sounds familiar... yeah well that's me all over! So I've thought about making a patchwork quilt but have NEVER gone past the 'thought' bit until now! Well, when I saw my teamie Liza at Cupcake Craft Challenges had chosen 'Patchwork Quilt' as the theme for our challenge this week then I just had to bite the bullet and throw myself into it! I've started small as I'm not best friends with my sewing machine so I didn't want to bite off more than I could chew (how many times have I given up on projects that were just a little too ambitious... cross stitch comes to mind...) Anyway, I had to head to Montmartre to buy my material, there's loads of fab textile shops there (any excuse to go to Paris lol)!

To start with I made a template for my 'squares' from thick cardboard... it measures 14cm x 14cm, but you could do any size really depending on the size of the quilt. Now I read on the web that you can prewash fabrics (as there may be some shrinkage) before you start, but the rule seemed to be either you wash ALL fabrics to be used or you washed NONE... I went with the later option. I chose 7 different fabrics, all cotton, and started to cut my squares. I cut 63 squares in total, 9 of each fabric. At this point I must stress that you have to cut the squares very accurately, they MUST all be the same size!


Once I'd finished cutting I laid my squares out on the floor in a random pattern (although I did one square of each fabric on each row).

When I was happy with the design, I started to sew the squares together, one row at a time making sure that ALL the hems were of the same size. This is really important bacause when you come to sew the rows together if the hems or squares are not the same size then the 'patches' on your quilt won't line up (if you know what I mean). Once the squares were sewn into rows I ironed (oh I know I hate it too) each row so that the hems were flat and facing the same way (or you could open the hems out and iron them flat like this instead). You then need to sew all the squares together, row by row.

Now, you need to cut your material for the back of the quilt and the filling (called wadding or batting) to go in the middle. I chose a plain cream cotton for the back and a thin wadding. These must be cut an inch or two larger than the patchwork front, as they'll be trimmed to size later. You begin by laying down the backing material, wrong side facing up, on the floor. I stuck this to the floor with masking tape so there was no creases etc. I then laid the wadding on top, which is when my little cat decided that it made a rather cosy bed for him... ah he is a cutie. With the cat safely removed, I then laid my patchwork on top, right side facing up.

To keep everything in place, I used safety pins and pinned all the layers together working from the middle outwards, making sure it was smooth with no wrinkles and creases. This is what it looked like at this stage...

Now it was time to coax the sewing machine into doing what I wanted it to do... I did say we weren't the best of friends the sewing machine & I... starting with the outer hem I hemmed all the way around the quilt to hold everything in place. I then stitched diagonally across the squares to make it more secure and give it a more quilt-like look. Once finished I carefully trimmed all the excess backing material and wadding so that the edges were neat and looked like this...


The final part is to attach the binding to the edge of the quilt. I used one long piece of binding, enough to go around the whole quilt. I started by opening out the binding and putting the right side of it to the right side of the quilt. I then stitched this all the way around using a running stitch. To finish off I turned the binding over the edge of the quilt and then hand stitched this to the back of the quilt with invisible stitches (well a man on a galloping horse wouldn't see them). This bit took AGES, and it's only a small quilt (the finshed quilt measures 120cm x 87cm). You could also do this bit on the sewing machine to save time, but you'd see the stitches.

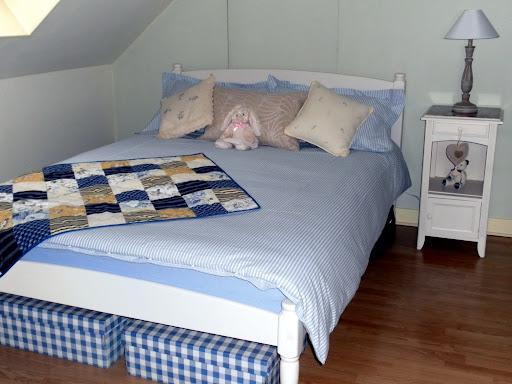
And here's the finished (mini) quilt in my home. I have to say for my first attempt I'm really pleased with my efforts! It took a long time to do but was definately worth it! A great little quilt to snuggle under on the sofa when watching tv this winter!

Now if I can make this anyone can... I have to say I'm now friends with my sewing machine and we plan to meet again soon ;) This small quilt would be idea for a baby's cot, and so cute!

Challenges I'm entering with my quilt:
By the Cute & Girly - All things bright & beautiful

I hope you haven't all fallen asleep by now as I must tell you to visit Cupcake to see the other fab projects my DT buddies have made for you to feast your eyes on! There's also some super sponsors offering prizes! This week our sponsor is Simon Says Stamp who are giving away a $20 Gift Certificate. And our monthly Icing on the Cupcake sponsor is Bunny Zoe's Crafts who has a £15 Gift Voucher up for grabs! Also we have another Choose the Challenge Competition coming up on WEDNESDAY... watch out over at Cupcake for the details!

Saturday 3 September 2011

RED OR BLACK?

Anyone see RED OR BLACK on telly... how amazing for that lad to win £1,000,000 quid! He seems like a nice guy so good luck to him and his family. How cool would it be to win that amount of money? What would you spend it on?

Anyway, here's a little thank you card I made a while back and didn't share, the image is a freebie stamp (Pink Petticoat) from a craft magazine. The flower is coloured with Promarkers.